How to Add MCP Tools to ChatGPT
Current step-by-step guide to connecting a remote MCP server to ChatGPT, with developer mode setup, plan caveats, HTTPS requirements, auth options, and troubleshooting.
To add MCP tools to ChatGPT, you need a remote MCP server with a public HTTPS /mcp endpoint, access to ChatGPT's app setup flow, and tool descriptors ChatGPT can understand. Once the server is reachable, you create an app or connector inside ChatGPT, point it at the endpoint, review the discovered tools, and then enable it inside a conversation.
The confusing part is that OpenAI now uses "apps" as the umbrella term. The Apps in ChatGPT help article says the connectors rename landed on December 17, 2025, while the Apps SDK docs still walk you through a connector creation flow. The safe mental model is simple: build or deploy a remote MCP server first, then connect it to ChatGPT through the current apps or connectors settings surface. If you only need MCP background, start with What Is MCP?.
The shortest version
Here is the current flow in four steps:
- Build or deploy a remote MCP server with a public HTTPS
/mcpendpoint. - Check whether your ChatGPT account or workspace actually has developer mode or app creation access.
- In ChatGPT, create an app or connector and paste the endpoint URL.
- Add that app to a conversation and test prompts that should trigger the tools.
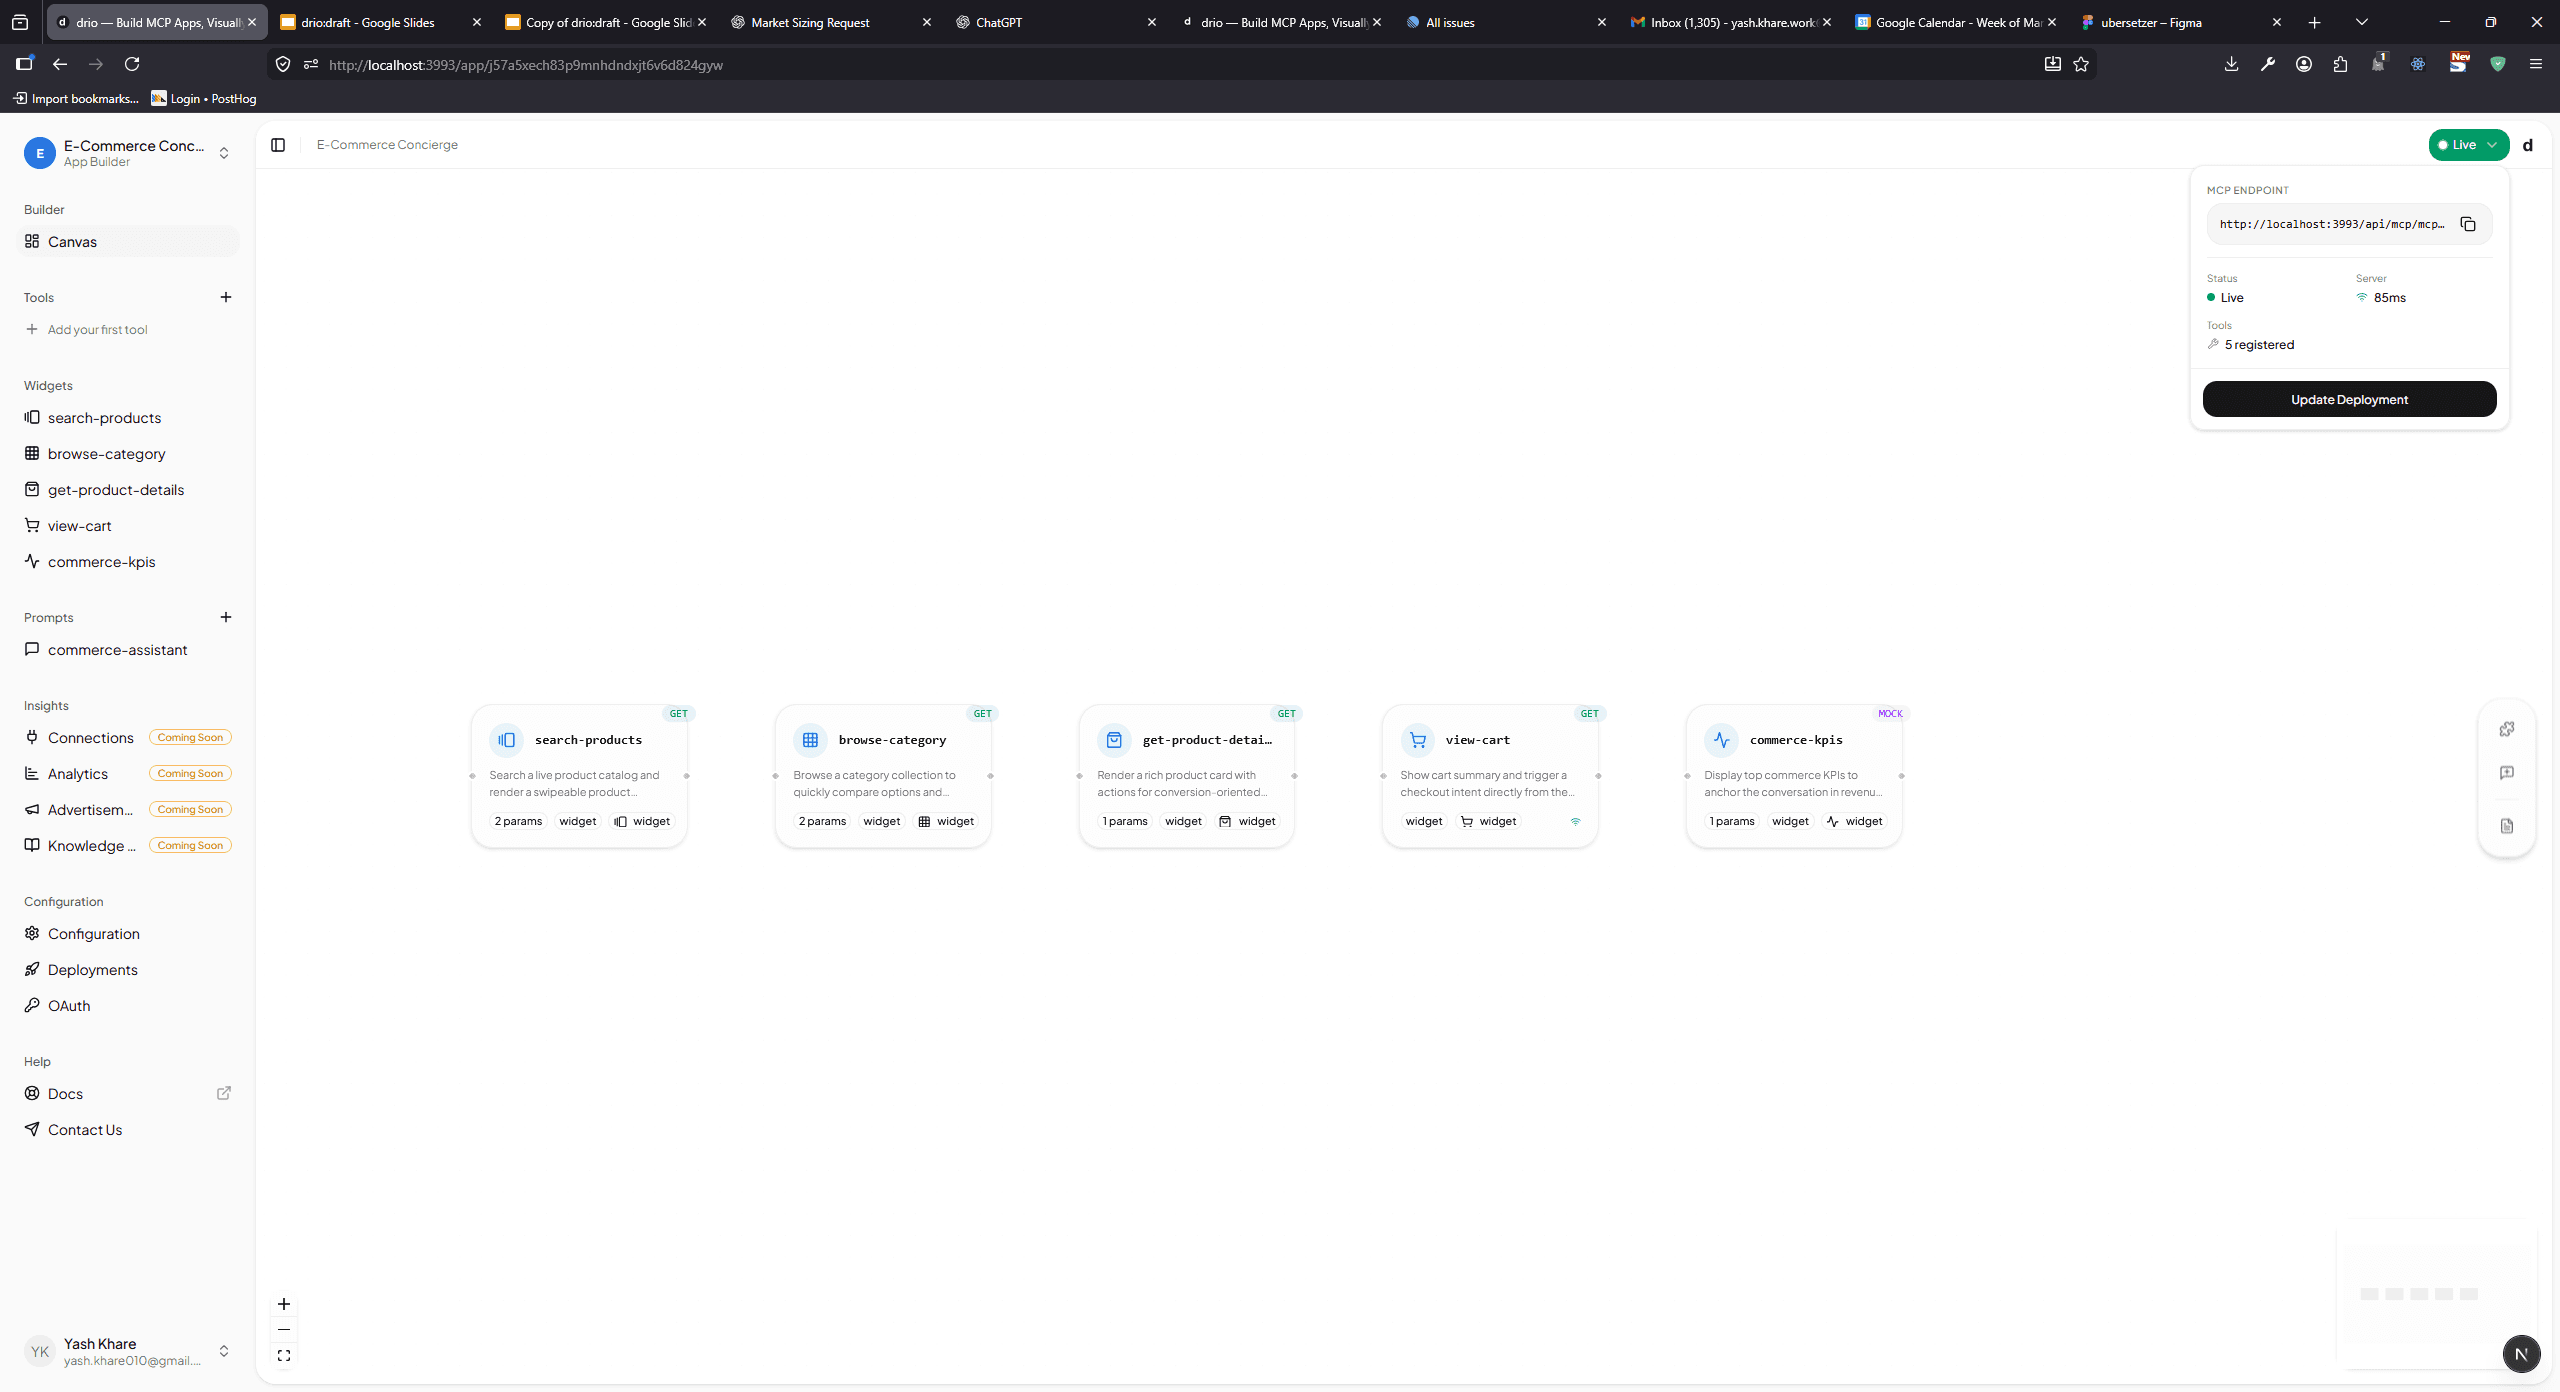
If you are using drio, the builder already gives you the endpoint you need. In that case, jump to Connect to AI clients after your app is configured.
First, know which ChatGPT surface you are using
OpenAI currently documents this in a few places, and they describe slightly different scopes.
- The Apps SDK "Connect from ChatGPT" guide says you can test your app with your own account using developer mode, and notes that as of November 13, 2025, ChatGPT Apps are supported on all plans.
- The ChatGPT developer mode guide says developer mode is in beta on the web for Pro, Plus, Business, Enterprise, and Education accounts.
- The help-center beta article for developer mode and MCP apps says full MCP support and workspace publishing are currently centered on Business and Enterprise/Edu, while Pro users can connect MCPs with read and fetch permissions in developer mode.
The practical takeaway is: before you debug your server, confirm which setup you are actually using.
- Personal testing: use developer mode with your own account if the toggle is available.
- Workspace rollout: check admin policy, plan limits, and publish permissions first.
If your workspace blocks developer mode, no amount of endpoint debugging will fix that.
What ChatGPT means by "your MCP server"
When ChatGPT asks for an MCP URL, it is asking for the remote program that exposes your tools.
According to OpenAI's build guide for MCP servers, that server is responsible for:
- defining the tools
- enforcing auth
- returning data and structured content
- optionally pointing tools to a UI bundle for richer experiences
That means the URL you paste into ChatGPT is not your homepage, your API docs, or your dashboard link. It is the public endpoint for the MCP server itself.
https://your-domain.com/mcpThe Apps SDK connection guide explicitly says ChatGPT expects the public /mcp endpoint of your server.
Step 1: make the server reachable over HTTPS
This is the first hard requirement. ChatGPT cannot connect to a local-only process.
The developer mode guide says remote MCP servers are created from ChatGPT and lists SSE and streaming HTTP as supported protocols. The help-center beta article is even more direct: local MCP servers are not currently supported.
For development, OpenAI's Apps SDK connection docs recommend tunneling localhost through tools like ngrok or Cloudflare Tunnel so ChatGPT can reach your server over HTTPS.
Minimum checklist:
- public HTTPS URL
- stable
/mcppath - remotely reachable from ChatGPT
- valid auth configuration, if your server needs it
The same developer mode guide says ChatGPT currently supports:
- OAuth
- No Authentication
- Mixed Authentication
If you are using drio, this part is simpler: each app gets its own endpoint, and the docs walk you through sharing that endpoint with AI clients.
Step 2: make the tool descriptors easy for ChatGPT to choose
A working endpoint is not enough. Tool metadata drives selection.
OpenAI's build-your-server guide recommends defining one tool per user intent and writing descriptors the model can reason about. That includes:
- action-oriented tool names
- clear "use this when..." descriptions
- parameter descriptions and enums where relevant
- accurate tool annotations
This matters more than most guides admit. The model is deciding when to use the tool, not a human clicking a button in a classic UI.
OpenAI's same guide also says MCP tool annotations are required. The three important hints are:
readOnlyHintopenWorldHintdestructiveHint
For example, a read-only lookup tool should be described very differently from something that writes records or deletes data. If those hints are missing or inaccurate, ChatGPT will either behave cautiously, prompt for confirmation at the wrong time, or make tool selection less reliable.
If you are building visually in drio, this is still part of the job. The no-code path removes server boilerplate, not the need for clear tool boundaries.
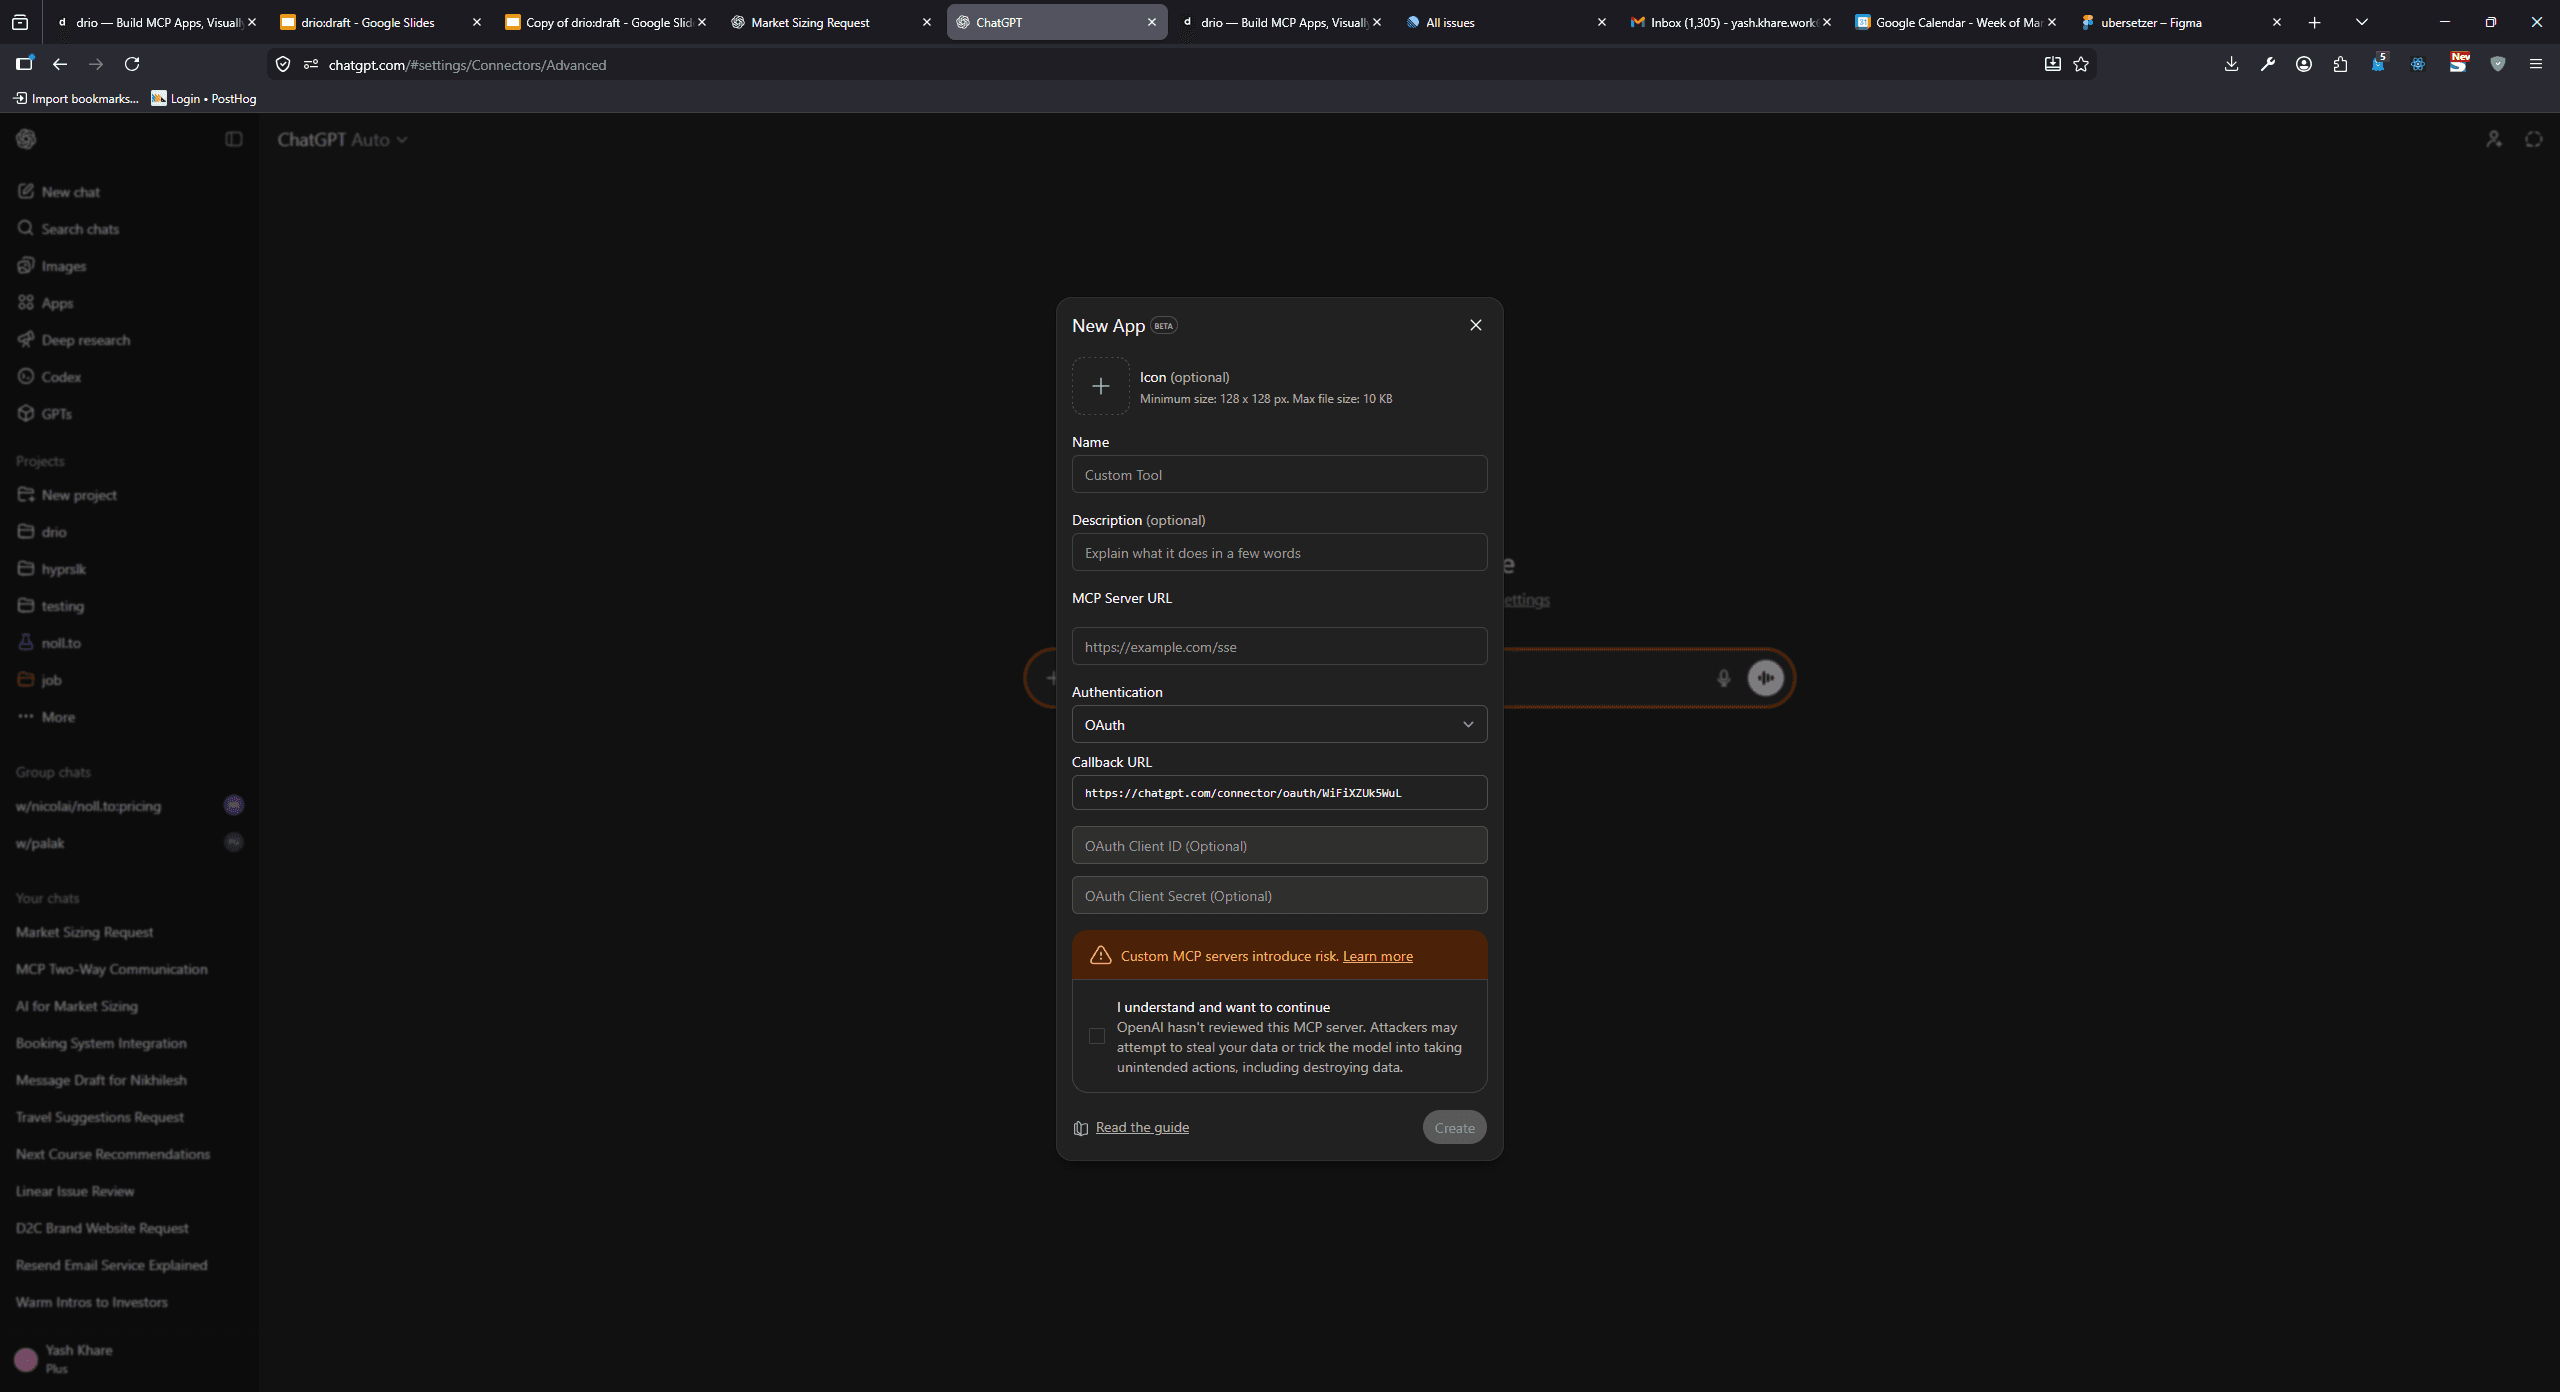
Step 3: create the app or connector in ChatGPT
Once the server is reachable, move to ChatGPT.
The current OpenAI docs describe the setup flow like this:
- Go to Settings -> Apps & Connectors -> Advanced settings and enable developer mode if your account or workspace allows it.
- Open the app or connector creation flow.
- Enter the metadata ChatGPT asks for:
- Name
- Description
- Connector URL or app URL, which should be your public
/mcpendpoint
- Save or create the connector.
- If the connection succeeds, ChatGPT will show the tools the server advertises.
OpenAI's Connect from ChatGPT guide says you should see a list of discovered tools immediately after a successful connection.
Step 4: activate it in a conversation and test real prompts
Creating the connector is not the same thing as actually using it in a chat.
OpenAI's connection guide says the next step is to open a new chat, click the + button near the composer, choose More, and select the connector from the list of available tools.
From there, test prompts that clearly match the tool:
- "Show me the latest support tickets assigned to me"
- "Get the weather in Berlin for the next seven days"
- "List open opportunities for Acme in the CRM"
The developer mode guide also recommends being explicit when multiple apps overlap. If ChatGPT keeps choosing the wrong tool, say which connector and tool to use, and tell it not to use alternatives.

Want the fastest path? Use drio as the server layer
If you do not want to hand-roll an MCP server, drio is the faster route:
- Build the tool visually.
- Connect the API or data source.
- Choose the widget output.
- Copy the generated endpoint.
- Connect that endpoint in ChatGPT.
The useful docs path is:
If you want the bigger picture first, Build AI Apps Without Code covers where the no-code path makes sense and where it does not.
Test the server before you blame ChatGPT
OpenAI's build guide explicitly recommends using MCP Inspector early. That catches a lot of avoidable setup problems before you even open ChatGPT.
Use Inspector to verify:
- the endpoint is reachable
- tools are discoverable
- schemas are valid
- structured responses look sane
- any embedded UI actually renders
Troubleshooting the failures people usually hit
"What is MCP server ChatGPT?" is the wrong mental model
The MCP server is not a built-in ChatGPT feature you toggle on. It is the remote program you host or deploy. ChatGPT is the client-side surface that connects to it.
If you mix those up, the whole setup feels more mysterious than it is.
My local server works in development, but ChatGPT cannot connect
That is expected if the server is only local. OpenAI's help-center beta doc says local MCP servers are not currently supported. Expose the server through HTTPS with a tunnel or deploy it to a public host.
The connector creates successfully, but no tools appear
Check these first:
- wrong endpoint path
- broken auth
- invalid tool schemas
- empty tool list
- server is reachable, but the MCP handshake fails
This is where Inspector is faster than trial-and-error inside ChatGPT.
ChatGPT connects, but it never chooses the right tool
This is usually a metadata problem, not a protocol problem.
OpenAI's server guide says tool descriptions should explain when to use the tool, what not to use it for, and how parameters should look. Generic names like run, search, or action make tool routing worse.
Write actions keep asking for confirmation
That is often the expected behavior. The developer mode guide says write actions require confirmation by default, and it respects readOnlyHint when deciding how cautious to be.
I can see the docs, but my workspace still cannot enable it
Check the plan and admin scope, not just the API docs. OpenAI's current documentation splits personal testing, workspace publishing, and full-MCP beta permissions across different pages. If you are in a managed workspace, your admin settings may be the blocker.
Do I need search or fetch tools first?
No. The help-center beta doc says search and fetch tools are no longer required for connected servers.
What to do next
Once the connector works, do not stop at a demo prompt.
- test five to ten real prompts from your users
- tighten tool descriptions until selection is consistent
- trim structured payloads so the model sees only what it needs
- add one or two follow-up tools that turn a lookup into a workflow
If the goal is a polished app instead of a raw server hookup, the next best reads are Build Custom ChatGPT Tools with MCP and Building MCP Tools with Rich UIs.
Summary
Adding MCP tools to ChatGPT is a remote-server setup problem first and a prompt-design problem second. You need a public HTTPS /mcp endpoint, account or workspace access to ChatGPT's app setup flow, and tool metadata the model can reason about. After that, the flow is straightforward: connect the server, review the discovered tools, enable the app in a conversation, and test real prompts.
The biggest mistakes are also predictable: trying to use a local-only server, assuming plan access before checking developer mode, and treating tool descriptions like an afterthought. Fix those early and the rest of the setup gets much less dramatic.
FAQ
Can ChatGPT connect to a local MCP server?
Not directly. OpenAI's current help-center docs say only remote servers are supported, so local development needs a public HTTPS tunnel or a deployed host.
Which protocols and auth methods does ChatGPT support for MCP?
OpenAI's developer mode docs list SSE and streaming HTTP as supported MCP protocols, and OAuth, No Authentication, and Mixed Authentication as supported auth options.
Do I need search or fetch tools to connect an MCP app?
No. OpenAI's current beta help doc says search and fetch tools are no longer required for connected servers.
Can ChatGPT render interactive UI from MCP apps?
Yes. OpenAI's Apps SDK docs say ChatGPT supports the MCP Apps open standard for embedded app UIs, which run inside an iframe and communicate over the standard ui/* bridge.
Which ChatGPT plans can use this?
That depends on the exact surface. OpenAI's current docs split this across Apps SDK deployment docs, the developer mode guide, and the help center. Personal developer-mode testing, workspace publishing, and full write-capable MCP access are not described as the same thing, so check the current plan and workspace policy before assuming full availability.
Get the Builder Brief
Weekly tactical notes on shipping ChatGPT apps, MCP integrations, and product-led distribution.